You
Are Here: Greyghost > Features Page > Cen-Tech/Harbor Freight
#92020 Digital Multimeter Constant Backlight Modification
Cen-Tech/Harbor Freight #92020 Digital Multimeter Constant Backlight Modification
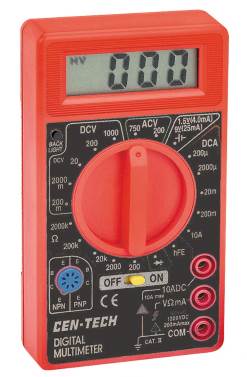 Amongst Harbor Freight's many digital multimeter options is the lesser
known #92020 variant. This meter differs from the #98025 and #69096 by
way of an orange backlight for the display. In addition to my being a
sucker for almost anything that lights up, the backlight does lend
considerable utility to these inexpensive meters. There's a dollar
worth of difference between the two, and I'm certainly willing to spend
the dollar. (Update as of July 2018: HFT placed these on clearance
in December of 2017, with a price of less than $4! It is highly likely
that they have since sold out of all Harbor Freight stores. They are
definitely no longer on the HFT web site and I have not seen them in
any HFT store as of a few months later.)
You'll find these meters sold under many different names, colors and
model numbers, but they're all the same thing: variants of the Chinese
DT-830 manual ranging multimeter. I'd never recommend them for use on
the AC powerline (mainly because so many of them really aren't very
safe) but for low voltage DC and many resistance measurements they're
as good as you'll ever need. And if you're new to your electronics
hobby, the manual range selection forces you to think about what you're
measuring and why. That might slow you down enough to avoid making a
mistake, or it might not. Even if it doesn't, or if you decide that
working with electronics isn't your hobby, you aren't out much. Or if
you do get into electronics repair, you can easily move up to a better
meter in time.
I like the backlit variant (and wish Harbor Freight would, if just the
one time, offer them for free with a coupon) because almost any higher
quality multimeter has one and you'll be surprised how often you find
yourself working with a multimeter where there isn't sufficient light.
The problem is that the
backlight only stays on for about five seconds. Here again, you'll be
surprised where you find your hands busy enough, or that you need to
concentrate without the hassle of having to turn the backlight on.
Wouldn't it be nice if the backlight on the #92020 meter could just stay on? Why, yes it would!
I'd been thinking for a long time that this couldn't be that hard to do, but I never sat down and tried to figure it out. Here's what you do. But first...
Let's talk about SAFETY. You're
more likely to hurt the multimeter than you are anything else here, and
it's not like replacing it is expensive. However, the number of stupid
people in the world is absolutely mind boggling. Oh sure, we've all had
our moments where we did dumb things. Yet we can all think of people
who seem to exist only as a warning to others, or those that make you
honestly wonder how they're even still alive. Make sure you aren't
measuring anything with the multimeter when you go to modify it. Remove
the battery before you work on the circuit board. Be extremely careful
with a soldering iron and only work with solder in a well ventilated
area. If you've never soldered anything before, don't make this your
first project. Practice on some scrap circuit boards or components,
build an electronics kit or two and then come back here if you're still interested in doing this modification.
While I have found that Harbor
Freight is the only source for these backlit meters in my part of the
world, your situation may be different and this procedure should be
easily applied to other backlit versions of the DT-830 meter, since all
the designs are almost identical.
You will VOID ANY WARRANTY that Harbor Freight makes on this meter if you modify it.
Don't come crying to them or to me if you break your multimeter.
You'll need a roll of solder and a low wattage soldering pencil. I
personally use 60/40 leaded solder on everything because it's cheap,
easy to work with, available everywhere and even a small roll will last
you a very long time. You can go lead free if you want. I have no idea
what type of solder is used in these meters. As for the soldering iron,
if you have a high end temperature controlled Weller pencil-type iron,
that's great. You can certainly use it. Don't go out and buy one if you don't: Harbor
Freight also sells a soldering iron that will work perfectly well for this.
You don't need much more than a 15-20 watt model. It will cost you $10 or less.
Other things you'll need include a small Philips screwdriver (number
one ought to do nicely), a needle-nose pliers, some patience, and a
steady hand. If your vision isn't that great, get a magnifying glass or
perhaps some reading glasses. Got all that? Here we go. Get your
soldering iron ready and make sure it can't roll off somewhere to start
a fire.
1. Start by taking the meter apart, as though you were going to change
the battery. All that needs to come off is the rear cover. I'd strongly advise against getting too rambunctious with
the screws, as they only thread into cheap plastic. Once you're there,
you'll see the printed circuit board within. The backlight assembly
itself is a white plastic rectangle running the length of the display.
It's held in place by a black plastic strap that is screwed down at
each end. You can separate the white plastic rectangle from the
display. The LEDs within operate from five volts and draw around 35mA. (If ever the meter
broke down or was damaged, this might be a useful part for some other
project. That's something to think about before you just throw the whole thing into
the trash electronics recycling.)
It should go without saying that the meter's test leads need to be disconnected. The safest thing to do would be to remove them entirely from the meter and store them in a safe place.
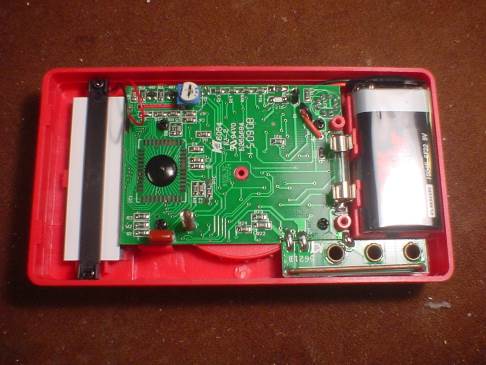
I strongly advise against removing the circuit board. If you do, the
ball bearings that serve to give the range/mode selector wheel its
"clicks" will get loose and they're a lot of fun to chase down on any
kind of flooring surface. A "zebra stripe" piece of plastic links the
display to the circuit board and this has to be secured pretty tightly
in order to work properly. What I've also found in several of these is that
the screw holes used to hold the circuit board in place are oftentimes
either stripped or right on the edge. Hence my suggestion not to
complicate your life. (You will also have to contend with the wires for
the backlight, which are none too sturdy looking and not soldered down
very well.)
2.
The area of interest is in the upper left corner of the circuit
board, near the backlight wires and the small adjustment potentiometer
(if your meter has one -- not all do). You'll see two small black cased
transistors (marked as "6Q2" and "6Q3" in the Harbor Freight version of
this meter). It is the former (6Q2) that is of the most interest to us,
as it is what ultimately turns on the backlight. I believe, but haven't
closely verified, that the circuit theory goes something like this:
upon pressing the backlight button, transistor 6Q3 is momentarily
turned on. This charges up a small capacitor and turns transistor 6Q2
on. The transistor remains on as the capacitor (C8) slowly discharges
through resistor R11 (91K ohm) into transistor 6Q2's base. Resistor R12
(47K ohm) is the current limiter for the LEDs.
With the cost to produce these meters
being 3/10ths of approximately nothing, and successive revisions having
more and more "cost optimization" done to them, I have to wonder why
the designers implemented what seems like an "extra" transistor in the
form of 6Q3. It's not likely that these transistors have a meaningful
cost in the vast quantities ordered by whoever makes these meters.
Perhaps the makers put it there to reduce accidental or atmospheric
triggers to the backlight. At this price and quality point, though, I'm
sure one doesn't get the best electrical engineering talent and that
might really be why the "extra" transistor is there: because someone
thought they needed it and nobody's come along to review the design and
say it isn't necessary.
Let's take a closer look at the actual board. (Somehow, I feel I ought to be saying "computer, enhance!" This is about as good as it gets with any digital camera that I have.)
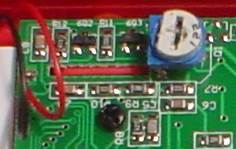
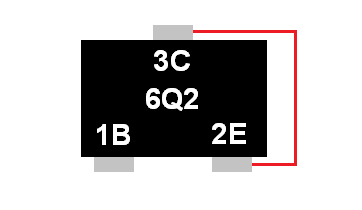
6Q2 is the small black component in the top row, third from the upper left edge.
(Be careful not to mistakenly adjust the potentiometer (white/blue
rotary control in this picture). Doing so will affect the accuracy of
the meter.) It's different from the larger transistors
you may be used to seeing. (This is an SOT-23 packaged NPN transistor,
type S9014, if you really want to know.) There is one electrical contact at the top
and two at the bottom. It's the top contact that represents the
collector (C), while the bottom left contact is the base and the bottom
right the emitter. We're going to short the collector (which gets its
power directly off of the power switch) to the emitter, which will
force the backlight to turn on continously.
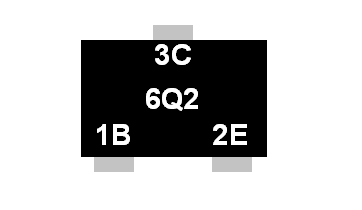
I hope your soldering iron is warmed up and ready! Tack a wire between
terminals 3 and 2. I found it helpful to add a bit of solder to the
terminals, and to use a needle-nose pliers so as to avoid burning the
daylights out of my fingers. For the wire I used a clipped off
component lead and carefully bent it into the needed shape before
tacking it down.
Note: It's possible (though rather unlikely) that the transistor might
be damaged by this. I certainly don't (yet) know the long term effects
this modification may have, if any. Reports of the backlights failing
in these meters are not uncommon. Of the eight or so that I now have,
only one suffered a backlight failure and did so right out of the box.
Here is what the completed modification looks like on the circuit board.

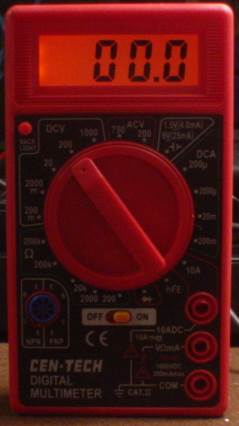
At this point you should have a multimeter whose backlight stays on
continually. (Wesley made the suggestion that I could install a switch,
if ever I wanted to turn the backlight off. Which either you or I might well want to do. See the notes below.)
Power Consumption
That suggestion does bring to mind something worth considering. Does
modifying this meter mean that it's going to start wolfing down three
rectangular batteries a day, for breakfast lunch and dinner? I set up a
contraption (warning: not dial-up or
low/limited bandwidth friendly) to find out. (The irony of using a well
known name brand, much higher quality meter has not gone unnoticed.)
The bad news is that doing this will
reduce your battery life considerably. That's doubly true if you're
running from the carbon-zinc "heavy duty" battery these meters come
with. With the backlight off, current drawn is around 0.27 milliamps or
270 microamps. That's assuming my measurement equipment is actually
accurate enough to go down that far. Turning on the backlight pushes
the current draw up to
around 38-42 milliamps.
Some time ago, I tested one of these meters to see how long it'd run
from a decent quality alkaline battery. It lasted about six weeks
before the low battery symbol came on. That happens around six volts,
so the meter gets basically everything a nine volt battery can possibly
give it. In a more realistic usage scenario, that may be years
of normal use! It also means that if you're forgetful and leave the
meter on by mistake (it has no auto power off circuit), you won't have
to worry too much.
A figure I found online suggests that a "good quality" nine volt
alkaline battery (PP3) is rated to deliver 500 milliamp-hours worth of
current. A number of different sources seem to back this up. Only nine
volt batteries don't take well to heavy loads, thus you would not get
anything like an hour's worth of operation with a 500 milliamp current
draw. In the best case, with the backlight on, you might get 10-11
hours worth of operation from the meter. Realistically, I think you're
going to get less.
Does it actually matter? I don't
really think so. The convenience to me far outweighs the cost. Most
people only use a multimeter for a few minutes worth of troubleshooting
before setting it aside. The only "gotcha" I can really think of is
that of leaving the meter on by mistake, since these don't have any
means by which to shut themselves off after being ignored for a while.
I've never found myself having that problem with these.
One could insert more resistance to
further reduce current flow and thus consumption of the battery. I may
experiment with this in time.
Other Caveats
Multimeters are continually exposed to potentially dangerous conditions. It can be argued that a meter like this should never
see high energy circuits or line voltage of any kind, but the fact of
the matter is that they do. It's also a very valid point that a
multimeter should never be modified in any way to ensure that its
safety features remain intact. Even the most well thought out of
modifications might well invalidate one or more safety measures built
into the original design. Truth be told, the DT-830 family of
multimeters have essentially no safety measures (some -- including
other variants sold by Harbor Freight -- don't even have a fuse!). The
backlight circuitry is well away from anything else within the meter.
You'll have to decide if this
modification is for you. It should go without saying that if you
perform this modification, you and you alone are responsible for the
results. Don't overestimate your capabilities. Killing the meter means
you're only out about $6. Killing or injuring yourself is a bit more
serious.
Exercises For The Reader
I'd love to know if you attempt any of these. I may try some of them myself in time.
- Extending backlight runtime.
- Reworking the backlight circuit to "latch" the backlight on or turn it off with a touch of the pushbutton.
- Changing resistance values to further limit the current use of the backlight, for longer battery life.
- Add an auto power off circuit to the meter.
- Add an external toggle switch to control the backlight (all external facing portions of the switch must be completely insulated)
Links 'N Such
If you're after the user's
manual (not that it tells you a whole lot, but whatever), it's right
here since these have a bad habit of disappearing from HFT's web site
after a product is discontinued (as these now are in July of 2018).
Mr. ModemHead took an in-depth look at the 92020 and 69096 multimeters from Harbor Freight and posted some of his own observations about each model. I disagree with his statement in "Myth #4", so long as you get one of these that works properly.
Test the meter to be sure before you come to rely on it. Test it
periodically in the future, the same as you would any other test
instrument. (What he says about the AC voltage measurement ranges is
very true in any example of the DT-830 meter family I've come across.
Only one out of maybe a hundred or so that I've worked with had a
problem with inaccuracy on the low ohms scale. It's worth considering
that the test leads do contribute a little resistance of their own,
especially since they are not the best quality.)
Better Meters?
There are lots to choose from
without breaking the bank, if and when you decide that you're ready for
something fancier than these Harbor Freight cheapies. As of this
writing, there are a number of similarly cheap and cheerful Chinese
options with considerably better build quality: the Victor VC921, Aneng
AN8001, AN8002, AN8008 and AN8009 (also known as "Kasuntest"), and the
HP-7xx series from HoldPeak. Most of these are true-RMS meters,
something that's important if you're measuring certain types of
alternating current sources. Move up in the market a bit and you'll
find affordable meters from the likes of Mastech and Uni-Trend. (Harbor
Freight resells the Mastech MS8229 as a Cen-Tech P98674. I have one and
I have been very happy with it. Review here. It too has been placed on clearance as of this writing.) Most of these cost around $20-60.
From names you're more likely to be familiar with, and companies that
will provide meaningful warranty coverage, Amprobe, Klein Tools and
even Southwire have some affordable and quite safe options. I
personally like Amprobe's AM-530 and the Southwire 13070T. The latter
lacks manual ranging capability, an omission I consider almost
inexcusable despite being quite fond of the meter otherwise.) These cost between $40-75.
And finally, if you really want the gold standard of multimeters, Fluke
has a few low end offerings, though most of these are only available on
the grey market in most places outside of the Pacific Rim. There's no
question that a Fluke meter will be among the safest you can buy (if
not in a class all by itself) but I just don't find the cost/value
proposition to be there. As of this writing, a Fluke 101 runs about
$75, maybe a bit less or more.
I generally recommend against
ever buying a used multimeter. While most people are very careful to
take care of their tools, you can't ever know how it was used and to
what abuse it may have been subjected. Important safety devices in a
multimeter can fail with sufficient abuse and they won't always leave
obvious traces to show that something has gone wrong. Accuracy can also
drift over time, and a used meter may require a calibration process
that eats up whatever money you would have saved.
Go Back > (to the top level index page)
Copyright © 2017-2018 by William R.
Walsh. Some rights reserved. Your rights to this material are governed
by the terms and conditions linked from the top level page of this
server. Please take a moment to read them. Any project involving the
use of electricity can be hazardous. Your safety and wellbeing are your
own responsibility -- not mine. This article is presented in good
faith, but no guarantee is made as to its suitability or safety for any
purpose. Last updated 07/06/2018, previously updated 12/17/2017.

 Amongst Harbor Freight's many digital multimeter options is the lesser
known #92020 variant. This meter differs from the #98025 and #69096 by
way of an orange backlight for the display. In addition to my being a
sucker for almost anything that lights up, the backlight does lend
considerable utility to these inexpensive meters. There's a dollar
worth of difference between the two, and I'm certainly willing to spend
the dollar. (Update as of July 2018: HFT placed these on clearance
in December of 2017, with a price of less than $4! It is highly likely
that they have since sold out of all Harbor Freight stores. They are
definitely no longer on the HFT web site and I have not seen them in
any HFT store as of a few months later.)


