You Are Here : Greyghost > Features > Controlling a Room/Window Air Conditioner with an External Thermostat
Controlling a Room/Window Air Conditioner with an External Thermostat
(also usable for heating control with slight changes)
Here's
another project that I've put off writing up for a really long time.
Although I may or may not end up finishing it in one sitting, starting
out on writing it up seems like a good thing to do on the back end of a
long weekend. Please be aware that I assume a residential 120 volt, 60
Hz North American perspective on electrical wiring because that's where
I am. Readers in other countries and situations may need to adjust
certain things or even seek a permit to do this sort of project.
Warning, Danger, Caution:
this is yet another project involving the AC powerline, high currents
and by implication, electricity. As useful as electricity can be,
things can quickly turn dangerous if you don't know what you're doing or things happen to go wrong. Don't overestimate your skill level.
If you're not sure, stop and seek qualified assistance. The time to
find out that you didn't understand something or made a mistake is NOT
after you've started a fire in your house, nor after you've hurt or
killed yourself or someone else. I am not responsible for your actions
or those of others, nor am I responsible for the results of your
following or inability to follow the information on this page. If you
can't accept that, please move on and don't attempt anything explained
here.
Ready made products for this same purpose exist, in case you don't feel that you're up to the challenge.
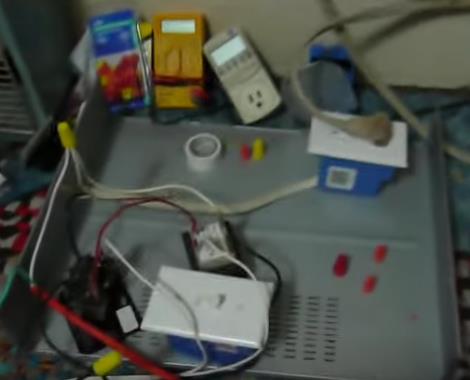
Also, here's an example of how you shouldn't do things, taken from a video I made a long time ago:
It's OK to do stuff like this for
testing. Just don't leave things this way. And don't use a really cheap
multimeter (like the yellow DT-830 seen in the picture) to do work with
line voltage. You don't have to spend a lot more to get something much better and safer.
What You'll Need:
- Decent Hand Tools (philips and bladed screwdrivers, pliers, wire stripper -- a wire jacket cutter is optional)
- Thermostat (programmable or not is your choice, even an old mercury bulb type is fine, though you will have to level it)
- Thermostat Wire (two conductor wire is fine, if all you want to do is control ONE heating OR cooling device)
- Power Cord with Suitable Plug (here in the US/Canada, that's a NEMA 5-15 -- you can also hardwire to a dedicated circuit)
- Wire Nuts® or similar wire fasteners (these days I really like
the Wago Push Wire products and similar -- get some and you'll see why)
- HVAC Contactor (or a suitably heavy relay) with a 24 volt coil intended for AC operation, normally open contacts
- Blinkenlights (optional)
- Female Spade Connectors (crimp or solder type as appropriate and to your preference, if your contactor or relay calls for them)
- Be sure to get the appropriate types for the wire gauge you are using.
- NEMA 5-15 receptable (for US/Canada electrical applications) or 5-20 if your equipment is large enough to require such.
- Romex® or Appropriate Electrical Wire (usually 12 or 14 gauge, two wire with ground -- lower numbers are thicker wires)
- Conduit and Conduit Bender (optional)
- Electrical Boxes (the blue plastic ones are generally fine, but you can use metal ones if you want)
- "Standard" Light Switch (most are rated for 15 amps, get a 20 amp version if your application warrants)
- 24 Volt HVAC or "Control" Transformer (or whatever's appropriate for the coil voltage of the relay or contactor that you have)
- Relays and contactors having line voltage coils are available, and if you have one of those, you can skip the transformer.
- NEMA box or similar enclosure of a suitable size. I've used
retired HVAC disconnect boxes for these, but I don't know where that
stands with any country's electrical or fire code.
- Multimeter (for troubleshooting and checking things)
- 1-3 amp fast-blow Fuse and Fuse Holder
- Power Drill and Bits (as needed for your enclosure and mounting things)
How To Hook It Up
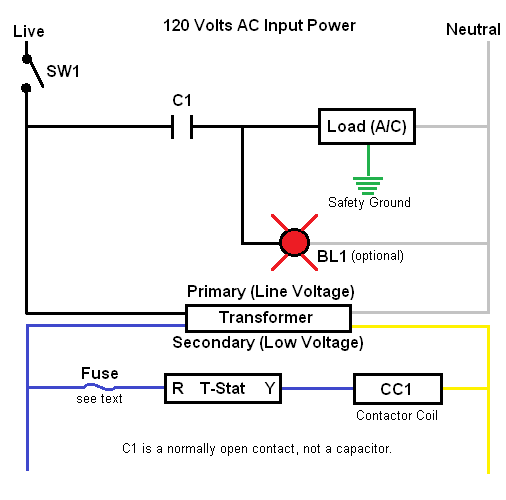
(a picture's worth a thousand words, so that's where I'll start)
Prepare all of your wiring materials
and make sure your tools are ready. You don't need to break the bank on
tools, but cheap tools are not the bargain they may seem, even if
you're only ever planning on using them once. You'll be cursing a
subpar tool all through the build process and long after you're done.
Bring the "live" (or "hot") line
voltage to your contactor or relay's input (often labeled as "L1" or
similar) connector and also to your transformer's primary (if you are
using one). Most transformers come with short leads attached, usually
black for the "hot" and white for the "neutral" primary connections.
The neutral side of the line is never switched. (Yes, you can, but
doing so gives rise to potentially dangerous conditions.) From the
output (often labeled as "T1" or similar) of your contactor, go to the
"hot" side of your outlet. The correct screws are usually gold in color.
Connect the neutral (again,
unswitched!) to the silver colored terminals on your outlet and to the
transformer's primary. Again, most transformers come with short wires
preattached for the primary (and very often for the secondary as well).
The last thing to do here is to connect the safety ground -- yes,
really. The same as being plugged into a properly grounded outlet,
connecting safety ground to your outlet and anywhere else it's provided
for is very important.
If you have a "blinkenlight" (BL1 in
the diagram above), now's the time to hook it up. Whatever kind of
indicator you use, it needs to be designed for line voltage. Neon lamps
or small incandescent indicator lights are ideal. A LED can be used,
but will require a substantial (both in terms of value and power
dissipation!) resistor. Otherwise, your LED will soon turn into a DED
(dark emitting diode), possibly after catching fire, blowing a fuse or
tripping a circuit breaker. Should you want to use an LED, I'd recommend powering from the low voltage part of the circuit.
Warning: if you are using a relay or contactor whose coil is designed for use at line voltage, you also need a thermostat rated for line voltage use! A regular thermostat is not suitable!
Warning: don't connect any heating or cooling appliance directly to a thermostat unless you are SURE the thermostat is designed for that application.
I'd strongly recommend using a
conventional low voltage thermostat, control transformer and a
contactor or relay having a low voltage coil. It's far safer than
trying to bring full line voltage to everything.
Now it's time for the secondary,
or low voltage wiring. This is where you'll be connecting your
thermostat. I'd recommend inserting a fuse "first thing". You can buy a
fuse holder or use some of your female spade lugs (along with some heat
shrink tubing) to make a fuse holder. The fuse mainly serves to protect
your transformer, (hopefully) by blowing before the transformer
overheats or burns itself out. Depending upon the contactor or relay
you have selected, a one to three amp fast-blow fuse will suffice.
Connect one side of the transformer secondary to your fuse. Leave the
other one unconnected for now.
Go on from your fuse to the "R"
terminal on your thermostat. Power goes in to the thermostat here to be
switched when the thermostat calls for cooling. If your thermostat has
"Rh" and "Rc" terminals, use the one labeled "Rc". Should there be a
metal jumper connecting these two terminals (as there often is on a
brand new thermostat having both of them) you can connect to either.
Just make sure that the little metal jumper stays in place.
Connect a wire to the "Y" terminal on your thermostat and take this to one of the coil connections (not the line or load connections!) on your relay or contactor.
Heating variation: if you are controlling a HEATER, connect to the "W" terminal on your thermostat instead of "Y".
Take another wire and connect it to
the other set of coil connection(s) on your relay or contactor. Go from
there to the other (as yet unused) wire from your transformer. This is
the common wire (not to be confused with, nor connected to, the "neutral" wire on the high voltage side of things).
You're just about ready to test for
basic operation. Prepare the thermostat as needed, and connect the
power cord (or turn on the dedicated circuit if you used one). Set the
thermostat for COOL and adjust the temperature so it's less than your
room temperature. Within seconds, the thermostat should call for
cooling and energize your contactor or relay. Most contactors will
produce a pretty good thump when they turn on, while a relay will
usually emit a fairly quiet click.
If things don't work, go back over
the steps and diagram above carefully. Look for stray bits of wire
poking out from around connectors, wires that may not have gotten
stripped, incorrect connections or other problems. When you've found
the trouble, correct it and replace the fuse if needed. Test again and
see if things work. (Be aware that most thermostats have a delay built
in to protect a controlled air conditioner from short cycling,
which can damage things. Be patient and wait for the delay to pass if
you shut the thermostat off and turned it back on right away.)
Turn the thermostat off. Within
seconds, your contactor or relay should open and disconnect power. You
can verify this is happening with a meter set to measure voltage or
something like a lamp.
Once you're sure everything is
operating and switching correctly, build it into a suitable enclosure,
test it again, and then try hooking your air conditioner or heater as
appropriate.
If possible, place your thermostat
away from drafts, outside walls, supply registers or the supply of
conditioned (cooled or heated) air from the controlled air conditioner
or heater. The better your thermostat's placement, the more
economically your equipment will operate.
Possible Results
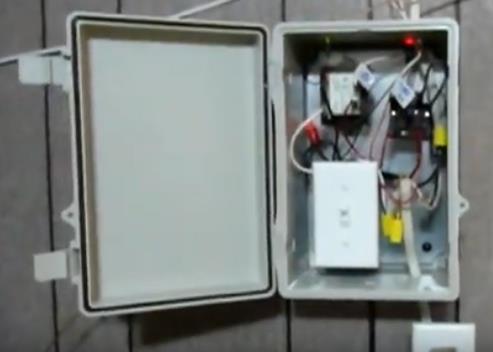
These are still images from videos
about the two units I built. Please accept my apologies for the poor
image quality. These were recorded roughly a decade ago relative to
this page's creation, using old digital cameras operating in their
video recording mode. I still have both boxes, though neither one is
fully wired up any longer.


It is bad practice (and definitely
against electrical codes) to run unprotected Romex® wire on walls and
whatnot as shown in both pictures. Both of these controllers were
temporary installations in a house I didn't care about, and they have
both since been taken out of service.
Variations
These are left to the reader as an exercise. (I just love it when other written works say this. Don't you?)
- Separate fan control using the
fan control wire on the thermostat (G terminal). This will require
changes to the unit being controlled.
- Multiple blinkenlights to indicate power available/control
enabled, cooling and heating operation. (One of my controllers had
never-utilized provisions for heating mode.)
- Short-cycle prevention external to the thermostat (for
thermostats that don't provide it, assuming you care). There are
various ready-made solutions for this, sold by companies such as ICM
Controls.
- Connecting a "common" wire to your thermostat so it can be powered without batteries, for thermostats that support such.
- Controlling both a heater and an air conditioner.
- ...and more besides...
This method works best with older and
simpler air conditioners having mechanical temperature controls. Still,
you may find that a more modern unit may operate more efficiently when
paired up with a temperature sensor that is located further away from
the unit and its airflow. I realized a considerable savings on my
utility bill by not only building these, but also programming the
thermostat to raise the temperature in the conditioned spaces when I
was away. (Turning the units off entirely would save even more energy,
but I had a DVR system that I didn't want to bake, at least not too
much.)
Hopefully by this point, you have
created your own working example of an external thermostatic control
for your air conditioner or heater. As always, I'm interested in your thoughts and comments.
Go Back> (to the top level page)
Copyright © 2021 by William R.
Walsh. Some rights reserved. Your rights to this material are governed
by the terms and conditions available from the top level page of this
server. Although this article is presented in good faith, it is
provided AS IS and without warranty of ANY KIND. You are responsible
for the results of your actions, whether good or bad. Last updated:
04/11/2021. Revised to add SW1 to the schematic above. Created 04/04/2021.


