Cleaning The Compaq LTE 5000 Keyboard
This page discusses how to safely and easily clean the keyboard on your Compaq LTE 5000 or 5000-series notebook computer.
 NOTICE:
As with any procedure, there is a certain chance that despite your (and
my!) best efforts to complete the task at hand that you could
experience or cause damage to your LTE's hardware. So make sure you
have the time to work on this project. I'd suggest devoting about 30
minutes to clean your computer's keyboard. That is about how long it
took me to prepare all the photos for this page while I cleaned my own
LTE 5000's keyboard. Please also note that while this information is
believed to be accurate and it worked for me; I am providing it only on
a "use at your own risk" basis.
NOTICE:
As with any procedure, there is a certain chance that despite your (and
my!) best efforts to complete the task at hand that you could
experience or cause damage to your LTE's hardware. So make sure you
have the time to work on this project. I'd suggest devoting about 30
minutes to clean your computer's keyboard. That is about how long it
took me to prepare all the photos for this page while I cleaned my own
LTE 5000's keyboard. Please also note that while this information is
believed to be accurate and it worked for me; I am providing it only on
a "use at your own risk" basis.
All keyboards collect an amazing amount of junk over time. The Compaq
LTE keyboard is no different. Since it is a portable computer it is
probably bound to collect more filth in the keyboard than most desktop
computers ever will. I usually find myself eating or drinking near the
computer (both are no-nos and I know that...) so the keyboard on mine
usually collects some of the residue from this action.
Fortunately, the Compaq LTE 5000 keyboard is easy to clean. All the
keycaps pop right off with some help from a fingernail or (more likely)
a small screwdriver. A lot of laptop computers don't let you take the
keys off without risking significant damage to the keyboard itself.
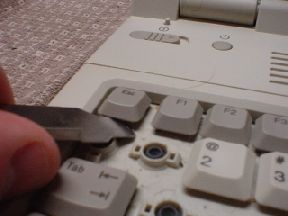
I'd strongly suggest starting with the smaller and outer keys on the
keyboard. Using the blade of a small, thinly bladed screwdriver, pry
the key up. It will pop up and become loose. Grab the key with your
fingers and set it aside.
Work your way around the keyboard while loosening and removing the
keys. Do not remove any of the larger keys until after you've read the
notes on doing so below.
Larger Keys
When it comes time to remove the larger keys on the keyboard, some
special care is required to remove them undamaged. The larger keys have
a metal bar structure attached to them. This is used to keep the
feeling of the key balanced as you press it. The metal bar hooks into
two small tabs on each key and on the opposite end, slides into two
rails that are part of the lower keyboard assembly plastic.
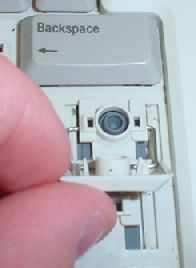
If you aren't comfortable removing the larger keys on the keyboard, you do not have to do so.
Removing the larger keys without damage is easy enough...but you have to make sure that you have done this one small extra step!
Pry the key up as you would any other. Be sure you pry as close to the
center of the key as you can as this is where the key is actually held
into place. Now, instead of just pulling the key up and removing it,
flip the keycap back up toward you as you face the machine. You should
now be able to see the metal support bar and how it slides out of the
base keyboard plastic.
DO NOT BE TEMPTED TO JUST YANK THESE KEYS OUT! Yes, you can do
exactly this but you run the risk of breaking the flimsy plastic tabs
that hold the metal bar inside each keycap! When you break the plastic
tab holding the bar in place on the keycap you will have a key that
does not respond evenly when pushed. Gluing the tab back together (if
you can even find it) is not likely to be easy or reliable.
When you are finally done removing keycaps you should have something that looks like this:
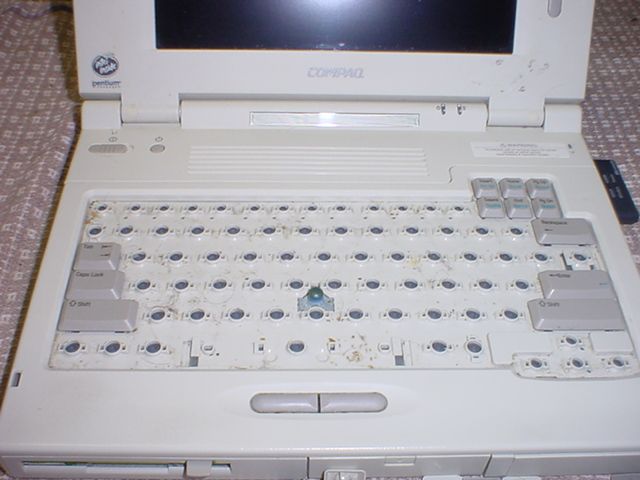
It is now time to clean the keyboard. (Yes, I know the keyboard above
is quite dirty. I usually eat and drink around my laptop when I'm using
it, and this shows!)
CAUTION: When using any liquid cleaner, read the directions on its use. Make sure the cleaner is safe for use on plastics. Do not use any abrasive cleaners or cleaning tools! Remove both the AC power and the battery from your LTE. While very sparing amounts of cleaner should be used (and never
sprayed on the keyboard itself!) leakage could cause damage in the form
of electrical shorts. Without power applied the likelihood of letting
any excess cleaner dry out and expecting normal operation afterward is
much greater!
A vacuum cleaner may be of use to pick up any obviously loose dust
before using a wet cleaning solution. After vacuuming (if needed), use
a wet cleaning solution of your choosing and proceed to clean the
keyboard. Apply
the cleaner ONLY to a clean rag or whatever you are using to clean your
LTE's keyboard. Do not apply cleaner directly to the keyboard. Wipe the lower keyboard area clean. Give it a few minutes to dry.

Take each keycap and clean it separately if needed. This can be done
with the paper towel and wet cleaner. You can also use a dishwasher or
washing machine to clean the keycaps as well. Simply place them in a
heat-safe mesh bag and securely knot any open ends. Place the bag in
the dishwasher or washing machine and use a low heat cycle with regular
detergent or soap.
Compaq used some type of plastic-safe lubricant to ensure smooth action
from the keys. Use care when cleaning the keys by hand so as not to
disturb this lubricating material. If you use a dishwasher or washing
machine, the lubricating material will be removed. It is not essential
to replace it, but you may find that the action of the keyboard is
stiffer after reassembly. If this bothers you, a small amount of a plastic-safe lubricant may be used on the posts that are inserted into the keyboard base when the keycaps are pushed down.
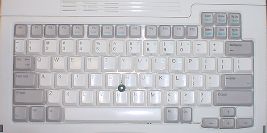
Now that looks a LOT better, doesn't it!
Putting The Keyboard Back Together
Reassembling the keyboard is easy. Simply push all the "regular" keys
back down over the little rubber pad. You will hear a "click"and the
key should now be securely in place. Press it a few times to confirm
that it works normally.
Larger keys with support bars require that you insert each edge of the
support bar into the corresponding track on the keyboard. To do this,
line up the bars with the tracks, and slide them into place. The flip
the keycap down and push it firmly into place. It will make a "pop"
noise. Test the key in the center and at each end to be sure it
functions normally. If the key does not seem level, repeat the
procedure until it is. Also check for broken ends if the bar was pulled
from the keycap. I don't know if you can repair this kind of damage--it
may be better at this point to get a good key from another LTE 5000
notebook computer.
You don't have to put the keys back in any particular order. Do you
what you feel comfortable with as you go along. (Aren't those old
typing lessons coming in handy now?)
That's all there is to it!
Please note that I don't suggest you even consider trying to remove the
pointing stick buttons to clean around them. I don't know if it is
possible to remove those buttons without taking the keyboard and
computer apart. You could cause damage to the computer or keyboard that
would be severe enough to require total replacement of either one!
If you have questions, comments or need some help, contact me!
Go Back>
Copyright ©2005-2007 by Walsh Computer Technology.
All Rights Reserved. Permission is granted to reproduce this material
in its entirely at no cost other than those required to cover
reasonable duplicating, media or connect time expenses.