The IRMAtrac adapter comes with one of three RIMs--the 4/16 software selectable RIM, the 4MBPS RIM, or the 4/16 Fiber RIM. If you have the 4/16 Fiber RIM, skip to the section "Updating the Backup Copy of the Reference Diskette." Otherwise, read the information in this section that applies to you.
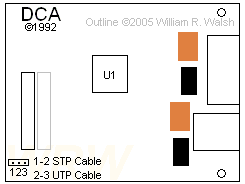
4/16 Software Selectable RIM - The 4/16 Software Selectable RIM has a jumper that must remain in its default position. Make sure the jumper is set to STP. This ensures that you can set the cable type through software. If the jumper is set to STP, continue with the next section, "Updating the Backup Copy of the Reference Diskette."
(Ed. If you're wondering as to why there is a jumper for selecting cable type on the software-controlled RIM, yes, there is a reason. Later on in the manual it says that if you use the new RIM with an earlier revision level card (which revision level?) then you must set the jumper for the type of cable you are using!)
4 MBPS RIM - If you have the 4 MBPS RIM, you may need to reset the four jumpers shown. These jumpers determine the cable type--STP or UTP. The default setting is for STP cable. If the STP setting applies to your environment, skip to the next section, "Updating The Backup Copy of the Reference Diskette."
To reset the jumper to UTP, carefully pull up each jumper and place it in the UTP position.
Note: Setting the 4 MBPS RIM jumpers to the STP position disables the RJ-11 (Ed. RJ-11?) connector (UTP); setting them to the UTP position disables the DB-9 connector (STP).
Updating The Backup Copy Of The Reference Diskette
Before you install IRMAtrac, you must update your working copy of the Reference Diskette. Read the IRMAtrac READ.ME file to find out which IRMAtrac diskette contains the ADF file. (Ed. For mine, it's Disk 1, which also contains an EISA .CFG file.)
Follow these steps:
1. Insert the backup copy of your PC Reference Diskette in drive A on turn on the PC power.
2. Choose the item from the main menu that allows you to copy an option diskette. This copies the ADF file from the IRMAtrac diskette to the backup copy of the Reference Diskette.
Note: Do not use the DOS copy command.
3. Store the original IRMAtrac diskette in a safe place. Continue with the next section, installing the adapter.
Installing The Adapter
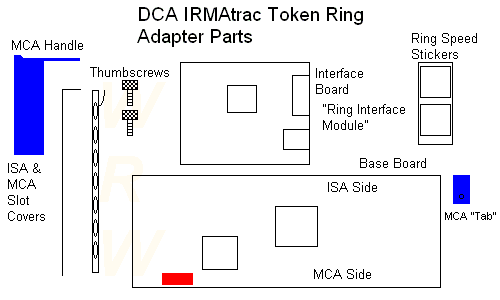
Installing IRMAtrac in a Microchannel system involves assembling the adapter and installing it in your PC. If you ordered the IRMAtrac Remote Boot ROM, make sure it is installed before you install the adapter.
WARNING: As with any other computer adapter or component, parts on this adapter are static sensitive. Perform all work in a static-safe workstation or exercise care if working in a normal environment. Remember to discharge any static electricity in your body by touching an unpainted metal surface in the computer.
To install the adapter in a Microchannel system, follow these steps:
1. Turn the IRMAtrac adapter so the side facing you reads "RIM this side for Micro Channel bus".
2. Snap the small blue plastic Microchannel card guide "A" into the top left corner of the adapter.
3. Hold the RIM so you can see the connector pins and two white support pins.
4. Seat the RIM on the adapter by aligning the RIM connector pins with the connector on the adapter. Then gently press down until the RIM connector is secure and the white support pins snap into place. The RIM should easily attach to the adapter if the pins and connectors are properly aligned. (Ed. Work slowly and carefully. Don't force things. Check pins for correct alignment. This isn't difficult...just take it easy and you'll do fine.)
5. Fit the two metal prongs of the Microchannel backplate under the hooks of the small Microchannel card guide "A". Then slip the backplate over the end of the adapter so the rails straddle the connectors.
6. Secure the Microchannel backplate with the two thumbscrews.
7. Fit the left end of the adapter into the groove on the large Microchannel card guide "C" and press the white support pins into the adapter. (Ed. Mine are blue as this is made of molded blue plastic. Yours may differ.) Move the top edge of the card guide onto the adapter and lock it into place.
8. Write the adapter data rate (4 or 16 MBPS) and hardware revision level on the backplate label. The hardware revision level is located on the backplate edge of the adapter. (For example, 017015 Rev A.) Then attach the label to the blackplate.
9. Install the adapter in your PC. Refer to your PC documentation for instructions.
10. Connect the PC to the MAU. Refer to your MAU documentation for instructions.
You are now ready to configure the adapter in your PC.
Changing The Configuration
Power on and autoconfigure unless you have a good reason not to do so. Either way, save your configuration and restart. When you do, the following (as per the manual) are the configuration defaults for the IRMAtrac adapter:
Adapter Data Rate: 4 MBPS
Cable Type: Shielded Twisted Pair (STP)
Interrupt Level: 3
DMA Arbitration Level: 4
Fairness For Bus Master DMA: On
Bus Release For Bus Master DMA: Delay
Adapter I/O Address: X`0A20`
Boot ROM Address Range/Disable: Disabled
If you need to change IRMAtrac's configuration or learn more about options, follow these steps:
1. Insert your backup copy of the reference diskette in drive A and turn on the PC power. Follow the instructions that appear on the panels until you see the main menu.
2. Choose the item from the main menu that lets you set the configuration.
3. Choose the item that allows you to change the configuration.
4. Make sure the slot number and adapter name (DCA IRMAtrac Token Ring Adapter/Convertible) are correct.
5. Choose the options you need to change. To learn more about an option, press F1 to display on-line help.
6. Use the function keys to choose the next or previous setting for each option.
7. Save the new configuration and exit the Change Configuration menu.
8. Exit the Set Configuration menu.
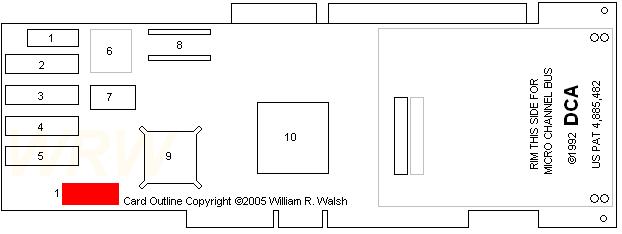
Adapter Outline - DCA IRMAtrac Token Ring Adapter/Convertible
Card-ID 5C1D
Unassembled Base Card:

Sorry, folks, I couldn't see any component IDs on this:
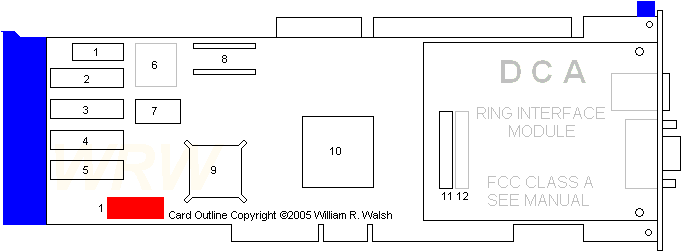
1 - 010357A
2-5 Unknown Maker - V53C464AP10L
6 - Pads
7 - Valpey-Fisher 64.000000MHz OSC
8. DIP BOOT ROM socket
9. Texas Instruments TMS380C16PQL
10 . DCA VP16515-2 "Victor 2"
Unassembled Software Selectable 4/16 RIM:

U1 - Texas Instruments TMS38054FNL
Orange - NEC EA2-5NJ
Black - Fil-Mag 78Z027SM
Assembled Card:

