I am nothing if not insatiably curious. Almost everything I end up buying or obtaining ends up being taken apart to at least some degree, mainly just to see how the designers built it, what parts they used and what features they thought about putting in but ended up leaving out. Usually taking most things apart is not a problem--I have very few "oops" moments and have never permanently lost a device to tinkering.
Well, I recently bought an Insignia NS-HDTUNE HD Radio tuner and just had to take it apart to see how it works. I found some surprising things when I opened the case cover.
WARNING, DANGER, CAUTION, etc: Taking apart your own NS-HDTUNE tuner could prove harmful to its health and well-being. Should you disassemble a tuner that isn't yours, your health and well-being could be in danger as well. If you're not sure, DON'T.
First things first, we've got to pull the cover. Removing the row of screws at the back and two screws from each side allows you to pull the cover up and off of the unit. There are no significant surprises here, nor is there much in the unit itself. A small board containing a main fuse leads to the power transformer, which goes on to the main board. Most of the main board is devoted to a AC-DC converter circuit and a microcontroller.
The NS-HDTUNE is made by international mega-brand He Sheng Acoustics Equipment Process Factory, whose name is printed on the power transformer and other places.
A SyncMOS SM5964C40-PP microcontroller is the most significant component outside of the tuner module, which has a construction like I have never seen before. It's made of thick pot metal. (There is a reason for this.) The SyncMOS part is a 8051 microcontroller complete with 64KB of onboard flash ROM and 1 kilobyte RAM. Although the 8051 is a very capable part, decoding an HD Radio signal, responding to inputs, determining when to switch between analog or HD signals and updating the display is a bit much to expect of it. There must be a more powerful processor somewhere else.
There's nothing interesting on the other side of the main board.
Where could it be? Let's take a closer look at that tuner module. Fortunately, it is socketed and not soldered to the board. Several small screws hold it together.
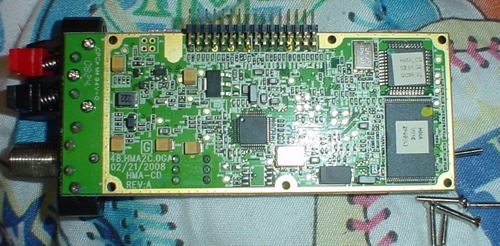
After undoing the screws, here is what is on one side of the board inside.

(always use ESD-safe work procedures -- this work was done on an ESD handling regulation compliant twin bed)
The major components on this side of the board consist of an Atmel ATmega32 microcontroller, a Texas Instruments DRI8201 analog front end, and assorted oscillators. The ATmega32 is interesting, but what does it do?

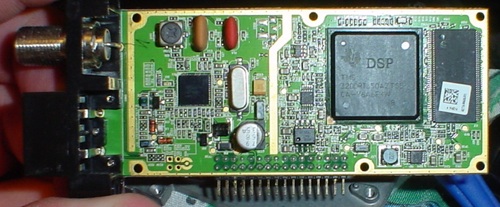
There is the HD Radio decoder at last! It's a Texas Instruments TMS320DRI350 DSP clocked at 80MHz and paired with an Etrontech SDRAM IC. Yes, the DSP is a member of the venerable TMS320 series of products. Over by the connectors is another tuner, this time an Atmel (!) ATR4262 AM/FM/weatherband (!) world tuner IC. It's unclear to me which of the two tuners is used for HD Radio, but I'd hazard a guess that the TI tuner on the other side handles this job.
I can only guess that the Atmel ATmega32 microcontroller somehow manages the TI DSP, but I don't know exactly what it would do that the DSP couldn't already handle by itself.
The only major remaining part of the tuner is the front panel, and there's nothing all that interesting about it. The two ribbon leads shown plugged into the main board lead to the front panel. The front panel is a simple single layer board, with another plug-in connector leading to the display unit. The display is driven by the SyncMOS microcontroller over a serial link. The display would have to decode this data, but I didn't find a decoding IC on the display board. For all I know, it could be under the display panel where I cannot see it. I wasn't going to risk disaster by attempting to pull the display board apart.
Note that if you plan to remove the display and button boards from the front bezel, you must be careful of the standby LED. The first time I put the board back into place, I found that I'd pinched the standby LED. No lasting harm was done, but removing all of those screws and pulling the board apart was annoying.
One thing that this teardown guide underscores is the cost of the component parts used in this unit. Although it seems like there are more microcontrollers than would be strictly necessary, there is still no way that there is anywhere near $100 worth of parts in here. I'd be surprised if there were more than about $30 worth and even that is probably high. This kind of begs the question why Best Buy has never put this unit on sale or lowered its price...perhaps iBiquity's royalties and per unit licensing fees are particularly high? I don't know.
Go Back>